

Lesson Learned:
4th year in the water....this years lesson learned:
If you back the trailer in too far the PVC goalpost extention will float for 2.8 seconds and sink to bottom of the ramp right after you YELL at your wife to jump in and grab the $3.00 pvc pipe....(she did not listen)
Lesson Learned....drill a hole in cap of PVC so it will not float...
26M launch HELP & tips please
-
Doug W

- Captain
- Posts: 632
- Joined: Tue Sep 02, 2008 7:08 pm
- Sailboat: MacGregor 26M
- Location: Prairie Home MO - Galactica - 2010 26M with Etec 60
- Contact:
Re: 26M launch HELP & tips please
chuckle. I drilled holes near the top to that no air would build and float the pvc pipe off... Then, not being satisfied, I ran a bolt through the pvc and factory guide post.
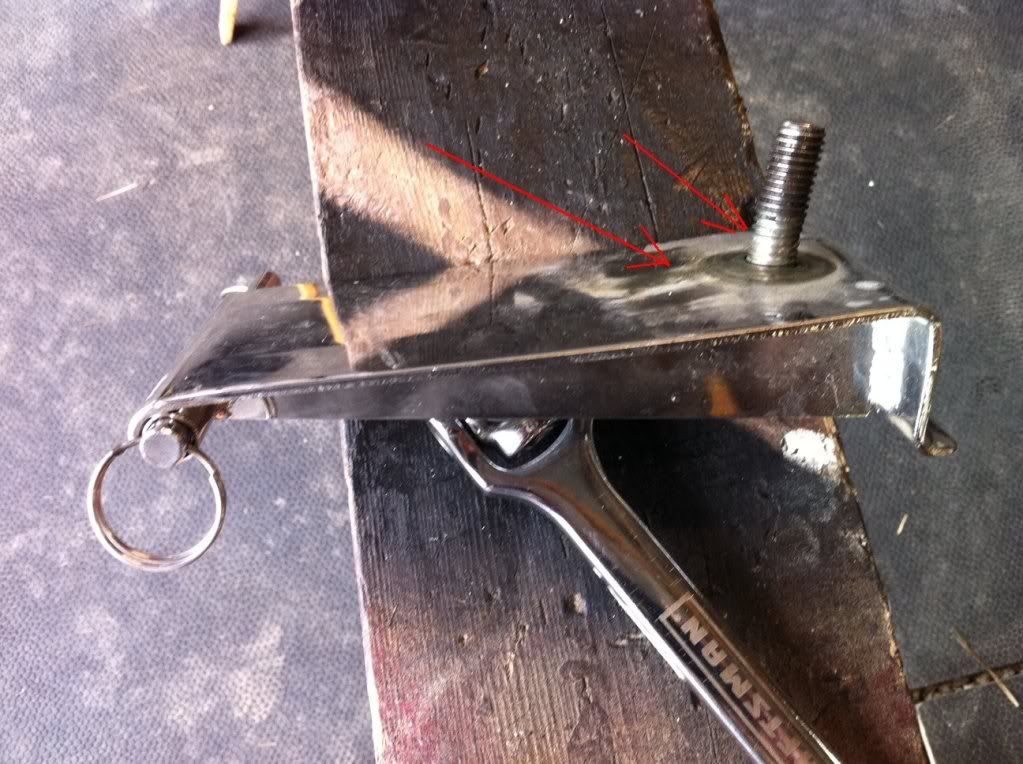
My lesson learned actually occurred last November when I last took her out; yet I discovered it a couple weeks ago when I removed my mast from the boat. I always trailer and am always looking for ways to trim rigging time. I have the mast base quick release pin from BWY. It works GREAT when used as designed. For some reason, I got the hair brained idea to use it to secure the mast base to the bow pulpit instead of the bolt/nut supplied with the boat.
It was faster to put the mast into trailering configuration. Unfortunately, I didn't back the trailer in as deep and came on with full ballast so I had to do the 'mac bump' (hitting brakes to slide the boat the last inch to the winch post). With the loose connection and inertia it ended up bending the 3/4" bolt which the mast rotates on; and even buckled the plate its welded to to boot!
A $51 call to BWY for a replacement base plate also resulted in her asking if I read the directions...which stated not to use the pin on the pulpit. Of course I didn't read it..I am a highly trained Information Technology Systems Administrator--never read instructions unless stuck, broke and nobody is looking... Lesson Learned #1 for 2011!
Doug
-
TFlight

- Engineer
- Posts: 112
- Joined: Mon Apr 04, 2011 7:28 pm
- Sailboat: MacGregor 26M
- Location: Rock Creek Baltimore, MD 2009 26M ETec 60
Re: 26M launch HELP & tips please
First I want to thank everyone for the feedback, suggestions, and tips.
I got “D’ Lay” out last weekend and launched at Sandy Point Bay Bridge, MD. This ramp and dock was much more suitable and longer without a 90 degree angled dock. I also got my depth finder to work and had more confidence of the water depth so I wasn’t afraid to use the fins and dagger board. Wow! The launch and recovery went 90% better. I set the fenders then ran a line forming a continuous loop from the stern to bow cleats and long enough to have about 5’ to tie to the tong ladder. I loosened the bow tie-down strap about 4’ then backed the SUV until the back wheels were in the water. It worked like a charm. “D’ Lay” floated off the trailer and I gently walked her back and was able to control her from bow to stern while securing her to the dock with my modified spring line. I managed this all by myself and only got one-foot wet, no big deal. Next time I’ll shoot for 100% and two dry feet. Once away from the trailer I lowered the finds and about 30% dagger board. Wow again!
  The boat handled and turned so much better.
Thanks again all
Tony
P.S. Jim and Chris sailed up the Chesapeake Bay in “Konig”. Nice to meet you guys.
I got “D’ Lay” out last weekend and launched at Sandy Point Bay Bridge, MD. This ramp and dock was much more suitable and longer without a 90 degree angled dock. I also got my depth finder to work and had more confidence of the water depth so I wasn’t afraid to use the fins and dagger board. Wow!
Thanks again all
Tony
P.S. Jim and Chris sailed up the Chesapeake Bay in “Konig”. Nice to meet you guys.
-
TFlight
- Engineer
- Posts: 112
- Joined: Mon Apr 04, 2011 7:28 pm
- Sailboat: MacGregor 26M
- Location: Rock Creek Baltimore, MD 2009 26M ETec 60
Re: 26M launch HELP & tips please
Doug,Doug W wrote:always looking for ways to trim rigging time. I have the mast base quick release pin from BWY. It works GREAT when used as designed. For some reason, I got the hair brained idea to use it to secure the mast base to the bow pulpit instead of the bolt/nut supplied with the boat.
Doug
I just made a mast base quick release pin and had intended to use it in the bow pulpit instead of the bolt/nut supplied with the boat.
Tony
Last edited by Hamin' X on Thu Apr 28, 2011 5:58 pm, edited 1 time in total.
Reason: Repaired Quote
Reason: Repaired Quote
-
dennisneal

- First Officer
- Posts: 399
- Joined: Tue Nov 06, 2007 5:36 pm
- Sailboat: MacGregor 26M
- Location: Riverside, CA, '06 26M, 60HP Etec; Sailing out of Marina Del Rey
Re: 26M launch HELP & tips please
I change into 12" high rubber boots to keep my feet dry when launching or retrieving our boat. Marina sea water is pretty yuckie.
-
dlandersson

- Admiral
- Posts: 4931
- Joined: Fri Aug 27, 2010 10:00 am
- Sailboat: MacGregor 26X
- Location: Michigan City
Re: 26M launch HELP & tips please
LOL!
Matt19020 wrote:...right after you YELL at your wife to jump in and grab the $3.00 pvc pipe....(she did not listen)
-
pokerrick1

- Admiral
- Posts: 2269
- Joined: Sun Aug 27, 2006 7:20 pm
- Sailboat: Venture 23
- Location: Las Vegas, NV (Henderson, near Lake Mead)
Re: 26M launch HELP & tips please
WUSdennisneal wrote:I change into 12" high rubber boots to keep my feet dry when launching or retrieving our boat. Marina sea water is pretty yuckie.
I just put on aqua slippers and a bathing suit or shorts
Rick
-
Hamin' X

- Site Admin
- Posts: 3464
- Joined: Sat Aug 27, 2005 6:02 pm
- Sailboat: MacGregor 26X
- Location: Hermiston, OR-----------2001 26X DF-50 Suz---------------(Now Sold)
- Contact:
Re: 26M launch HELP & tips please
I'm a WUS, too. I use irrigation boots (about $15-$20 at your local farm supply store) in our cold water here in the Columbia River. Water temp was in the 30's until mid March and is still in the mid 40's.

~Rich
~Rich
-
yukonbob

- Admiral
- Posts: 1918
- Joined: Mon Feb 14, 2011 6:54 pm
- Sailboat: Other
- Location: Whitehorse Yukon
Re: 26M launch HELP & tips please
If I could figure out how to post pics, i would show you what cold really is... 
-
Hamin' X
- Site Admin
- Posts: 3464
- Joined: Sat Aug 27, 2005 6:02 pm
- Sailboat: MacGregor 26X
- Location: Hermiston, OR-----------2001 26X DF-50 Suz---------------(Now Sold)
- Contact:
Posting Pictures
Pictures must be placed on a public server such as PhotoBucket. The instructions that follow are for photobucket, but other image hosting sites will be similar and this is not an endorsment of photobucket.
Go to your photobucket account.
Hover your mouse pointer over the picture that you want.
Several options will appear.
Go down to the IMG code and left click in the code box to the right.
Right click in the code box and select copy.
Now, while composing your post on this forum, right click at the place that you want the pic to appear and select paste. It will look like this:
It will appear on the forum like this:
Here is a picture that I took in the San Juan Islands:

Cool, huh?
The forum software will automatically re-size the pic for easy viewing and when a member left clicks on it, the original size will be viewable. The board does not actually download, or store the pic, it just uses the code to make your browser do the work. Repeat for up to three pics/post. It is best to use the "Preview" option, to make sure that everything is OK, before you submit the post. There is a three picture limit/post, to help protect those that still have slow internet (me when out & about).
Flickr is a little more difficult.
~Rich
Go to your photobucket account.
Hover your mouse pointer over the picture that you want.
Several options will appear.
Go down to the IMG code and left click in the code box to the right.
Right click in the code box and select copy.
Now, while composing your post on this forum, right click at the place that you want the pic to appear and select paste. It will look like this:
Code: Select all
Here is a picture that I took in the San Juan Islands:

[img]http://i496.photobucket.com/albums/rr321/Hamin-X/Gato128.jpg[/img]

Cool, huh?Here is a picture that I took in the San Juan Islands:
Cool, huh?
The forum software will automatically re-size the pic for easy viewing and when a member left clicks on it, the original size will be viewable. The board does not actually download, or store the pic, it just uses the code to make your browser do the work. Repeat for up to three pics/post. It is best to use the "Preview" option, to make sure that everything is OK, before you submit the post. There is a three picture limit/post, to help protect those that still have slow internet (me when out & about).
Flickr is a little more difficult.
- Left click on the pic that you want to post.
Above the pic, left click on "All Sizes".
Left click on the size that you want to post. Large works best.
Right click on the pic.
Left click on "Properties". A window will open.
Beside Address (URL), is the url that you will post. Copy all lines of it.
I triple click on it and it highlights all of it.
Above the edit window for your post, you will find a row of buttons.
Click on the Img button and it will place [Img] tags at the point of your cursor.
Copy and paste your Flikr URL between the [Img] tags in your post.
~Rich