

I do appreciate you setting me strait about the epoxy kmclemore and I thank Kelly Hanson East for turning on the light about what are ones use patterns. The thread about the electronic desalination chip (in ~2 years) http://web.mit.edu/newsoffice/2010/desa ... d=6145348z. I think a 5 to 10 gallon tank with chip system running to replenish for long term sounds like the best solution.
So... this being just an academic exercise, I'll try to defend that, because I think "Never" is a little extreme.
First, Consider the geometry up front. I think fastening a bladder down within the hull's V (both in plan view and in cross section view) inside the balast tank would be fairly strait forward and have little chance of going anywhere. Then consider the option, as some have done, of placing rather large bladders (80, even 150 liter) under the rear birth. How hard is it to keep that flat bladder's 300+ pounds under those cheap white panels when healed at 20 or 40 degrees, much less a knock down? For safety, I'd far rather have 300 lbs confined inside the balast tank up in the point than trying to keep it still under the rear birth.
Second, Consider that when motoring with empty balast, the forces are always down (towards the keel). The boat banks, but the force is still down... just like a bike. There isn't much lateral force so either bladder... in the ballast tank or under the rear birth are likely to stay right where they are.
Potable Water and Epoxy
-
Inquisitor

- Captain
- Posts: 926
- Joined: Mon Apr 23, 2007 5:24 pm
- Sailboat: MacGregor 26M
- Location: North Carolina Mountains
Re: Potable Water and Epoxy
Last edited by Inquisitor on Wed Apr 07, 2010 11:00 am, edited 1 time in total.
-
Russ

- Admiral
- Posts: 8336
- Joined: Thu Oct 11, 2007 12:01 pm
- Sailboat: MacGregor 26M
- Location: Bozeman, Montana "Luna Azul" 2008 M 70hp Suzi
Re: Potable Water and Epoxy
Good point. I guess I never think of this because I almost never run empty ballast. It's the emptying process that concerns me. A half full ballast tank and a huge wake from another boat could create a dangerous problem as the ballast sloshes to the wrong side.kmclemore wrote:Yes, but my point was that when you run WITHOUT ballast, as many of us do when motoring, the bladders can shift and cause you to flip.
Your system only works if you *never* empty your ballast.
Never.
Well then, the inserted bladders would need to be anchored somehow so they don't shift. If inserted like sausage tubes into the side ballast tanks, that might help. Still, the fresh water could move for and aft so they would need to be compartmentalized like links. Also, there would need to be a way to empty the fresh water bladders evenly so if you drained the sea water ballast the remaining fresh water weight would be distributed evenly.
All this is way too complicated to be feasible. Carrying that much fresh water on a 26' boat is a bit much. But if engineering and fabrication allowed it, keeping the weight in the ballast tanks would be ideal.
--Russ
-
The Mutt

- Captain
- Posts: 611
- Joined: Thu Nov 29, 2007 12:28 pm
- Sailboat: MacGregor 26X
- Location: Springwood, NSW, devinetemptations.com/macgregor26x.htm
- Contact:
Re: Potable Water and Epoxy
I had in mind making 2 long thin low bladders,one under the lower galley shelf, the other bladder on the starboard side to balance the water load. Personally I wouldn't be playing with the ballast tank.
I have already installed two 20 litre plastic drums on top of the ballast tank inside the V-berth seat. The extra bladders would be for extended trips away from known water sources.
Glenn
I have already installed two 20 litre plastic drums on top of the ballast tank inside the V-berth seat. The extra bladders would be for extended trips away from known water sources.
Glenn
-
DaveB

- Admiral
- Posts: 2543
- Joined: Mon Jan 07, 2008 2:34 pm
- Sailboat: MacGregor 26X
- Location: Cape Coral, Florida,1997 Mac. X, 2013 Merc.50hp Big Foot, sold 9/10/15
Re: Potable Water and Epoxy
Glen the 13 gal. fits like a glove under the Mac.X sink and locks itself in place between the hull and stringer. I can only put in 11 gal. in it for some reason. I measured it gal. by gal. first time I installed.
It will easy last for 5 day trip or more, we only use it for dishes,showers and cleanup. We carry Gal. and 20oz drinking water.
If one was to cruise in remote areas and chance of rain the boom tent with a spicket in middle raise would make a excellent water catcher, we used that method and also the deck in or 3 year Carribean cruise, we only had a 40 gal. Monel water tank.
Dave
The Mutt wrote:I had in mind making 2 long thin low bladders,one under the lower galley shelf, the other bladder on the starboard side to balance the water load. Personally I wouldn't be playing with the ballast tank.
I have already installed two 20 litre plastic drums on top of the ballast tank inside the V-berth seat. The extra bladders would be for extended trips away from known water sources.
Glenn
-
kmclemore

- Site Admin
- Posts: 6271
- Joined: Sun Feb 08, 2004 9:24 am
- Sailboat: MacGregor 26X
- Location: Ambler, PA -- MACX2018A898 w/ Suzuki DF60AV -- 78 BW Harpoon 4.6 -- 2018 Tahoe 550TF w/ 150 Merc
Re: Potable Water and Epoxy
My water system.
Ultra cheap, efficient, and works great. Holds 14+ gallons.

Parts:
The hook-eyes get screwed into the bulkhead and the trucker's strap holds the tanks against the bulkhead... they never move.
The jugs... Reliance Aqua-Tainer's (7 gallons per jug, and sell for about $16.00 each)... and they fit perfectly between the shelf behind the V-berth and the bottom of the forward dinette seat... almost no up/down movement is possible. And that area is almost useless as a storage area anyway, since it's so hard to get to.
Oh, and unlike an expensive bladder, if the jugs get funky or have a problem they can be replaced in an afternoon, for next to nothing.

Ultra cheap, efficient, and works great. Holds 14+ gallons.
Parts:
- 2 plastic camping jugs
1 pump
1 fill bung
Some small diameter hose for a vent
1 vent valve (to shut when in motion, but it's not really needed)
Some large and medium diameter hose for the input/output lines
Assorted fittings and hose clamps... too many to mention, but you can see in the pics
1 in-line filter
2 threaded hook eyes and nuts/washers
1 trucker's strap
1 scrap piece of rug to go under the tanks to make them more silent and prevent chafing.
The hook-eyes get screwed into the bulkhead and the trucker's strap holds the tanks against the bulkhead... they never move.
The jugs... Reliance Aqua-Tainer's (7 gallons per jug, and sell for about $16.00 each)... and they fit perfectly between the shelf behind the V-berth and the bottom of the forward dinette seat... almost no up/down movement is possible. And that area is almost useless as a storage area anyway, since it's so hard to get to.
Oh, and unlike an expensive bladder, if the jugs get funky or have a problem they can be replaced in an afternoon, for next to nothing.
-
kmclemore
- Site Admin
- Posts: 6271
- Joined: Sun Feb 08, 2004 9:24 am
- Sailboat: MacGregor 26X
- Location: Ambler, PA -- MACX2018A898 w/ Suzuki DF60AV -- 78 BW Harpoon 4.6 -- 2018 Tahoe 550TF w/ 150 Merc
Re: Potable Water and Epoxy
More pics:

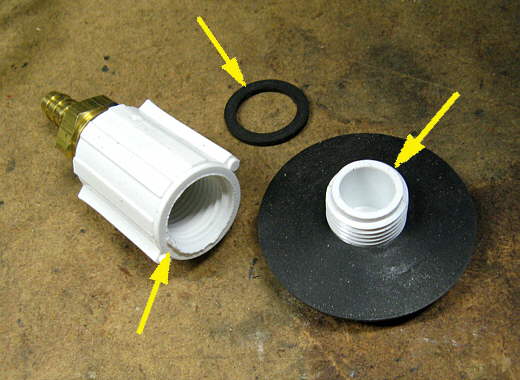
Above shows the fill bung and plumbing to fill the tanks. If you want an on-deck fill, you could run the hose the other way and up the side of the cabin to the deck. I didn't want that aggro, and besides, it's pretty easy to bring in a hose and fill'er up. Oh, and the old on-off valves that were in the jug's caps actually unscrew, so you can thread the inlet connection directly into the caps, as I have done here.

In this photo you can see the outlet plumbing... it is connected to what were the "vent" outlets on the tanks.
You can also see the very small air vent tubing - this goes up to a valve, about 1' above the tanks, and allows air to escape when filling tanks or using water. The air vent fittings were simply screwed into the tanks - I drilled the proper size hole, tapped it for 1/8"NPT and then screwed them in... at the top of the tank there's no water pressure to make them leak anyway.

Here you can see the outlet plumbing leading to the pump and in-line filter. The tubing has a "Y" in it after this point, with one branch going to the galley and one to the head.
Above shows the fill bung and plumbing to fill the tanks. If you want an on-deck fill, you could run the hose the other way and up the side of the cabin to the deck. I didn't want that aggro, and besides, it's pretty easy to bring in a hose and fill'er up. Oh, and the old on-off valves that were in the jug's caps actually unscrew, so you can thread the inlet connection directly into the caps, as I have done here.
In this photo you can see the outlet plumbing... it is connected to what were the "vent" outlets on the tanks.
You can also see the very small air vent tubing - this goes up to a valve, about 1' above the tanks, and allows air to escape when filling tanks or using water. The air vent fittings were simply screwed into the tanks - I drilled the proper size hole, tapped it for 1/8"NPT and then screwed them in... at the top of the tank there's no water pressure to make them leak anyway.
Here you can see the outlet plumbing leading to the pump and in-line filter. The tubing has a "Y" in it after this point, with one branch going to the galley and one to the head.
-
Duane Dunn, Allegro

- Admiral
- Posts: 2459
- Joined: Fri Jan 02, 2004 6:41 pm
- Sailboat: MacGregor 26X
- Location: Bellevue, Wa '96 26x, Tohatsu 90 TLDI and Plug In Hybrid Electric drive
- Contact:
Re: Potable Water and Epoxy
Mine is similar, but simpler
I use 2 each 5 gallon Coleman camping jugs. Through one of the fill valves I ran a piece of tubing that I then cable tied to a stiff piece of plastic. This is the dip tube that serves as the inlet to the system. Both jugs fit in the port side vee berth storage area with plenty of room for more stuff. From there the tubing goes to a hand primer bulb, like for the motor, and then on to my demand electric pump and faucet at the galley. When one jug is empty you just move the dip tube to the other one then are free to fill up the empty one at your leisure. I have them only plumbed to the galley sink as the we found we never really used the head sink, it is just a convenient storage container at this time.

Things I really like about the system.
Each jug can be individually removed and taken where ever necessary to be filled. This has been handy a number of times when the boat is not near a convenient faucet and we needed more water. You can even throw a jug in the dinghy and take it to shore to fill up in the campground at a park.
The lines are not pressurized so there is much less chance of a leak, yet you still get running water with the demand pump system.
The jugs are easy to fill at home without a hose, (no mess or spilling inside the boat) and they are also easy to empty and clean.
One 5 gallon jug usually lasts 2-3 days when out cruising with my family of 5.
I use 2 each 5 gallon Coleman camping jugs. Through one of the fill valves I ran a piece of tubing that I then cable tied to a stiff piece of plastic. This is the dip tube that serves as the inlet to the system. Both jugs fit in the port side vee berth storage area with plenty of room for more stuff. From there the tubing goes to a hand primer bulb, like for the motor, and then on to my demand electric pump and faucet at the galley. When one jug is empty you just move the dip tube to the other one then are free to fill up the empty one at your leisure. I have them only plumbed to the galley sink as the we found we never really used the head sink, it is just a convenient storage container at this time.
Things I really like about the system.
Each jug can be individually removed and taken where ever necessary to be filled. This has been handy a number of times when the boat is not near a convenient faucet and we needed more water. You can even throw a jug in the dinghy and take it to shore to fill up in the campground at a park.
The lines are not pressurized so there is much less chance of a leak, yet you still get running water with the demand pump system.
The jugs are easy to fill at home without a hose, (no mess or spilling inside the boat) and they are also easy to empty and clean.
One 5 gallon jug usually lasts 2-3 days when out cruising with my family of 5.
-
kmclemore
- Site Admin
- Posts: 6271
- Joined: Sun Feb 08, 2004 9:24 am
- Sailboat: MacGregor 26X
- Location: Ambler, PA -- MACX2018A898 w/ Suzuki DF60AV -- 78 BW Harpoon 4.6 -- 2018 Tahoe 550TF w/ 150 Merc
Re: Potable Water and Epoxy
Nice system. But just to clarify, my pump is also a demand pump, and draws *from* the tanks... so the tanks are under no pressure at any time.
-
Russ
- Admiral
- Posts: 8336
- Joined: Thu Oct 11, 2007 12:01 pm
- Sailboat: MacGregor 26M
- Location: Bozeman, Montana "Luna Azul" 2008 M 70hp Suzi
Re: Potable Water and Epoxy
Duane Dunn, Allegro wrote:Mine is similar, but simpler
I use 2 each 5 gallon Coleman camping jugs. Through one of the fill valves I ran a piece of tubing that I then cable tied to a stiff piece of plastic. This is the dip tube that serves as the inlet to the system. Both jugs fit in the port side vee berth storage area with plenty of room for more stuff. From there the tubing goes to a hand primer bulb, like for the motor, and then on to my demand electric pump and faucet at the galley. When one jug is empty you just move the dip tube to the other one then are free to fill up the empty one at your leisure. I have them only plumbed to the galley sink as the we found we never really used the head sink, it is just a convenient storage container at this time.
I love the simplicity of this system and I will probably adopt it.
How do you vent the jugs? Do you keep the vent open?
Do you leave the dip tube in the jug and connect your supply line to it when switching tanks?'
How do you then connect your supply line to the "stiff piece of plastic"?
--Russ
-
Duane Dunn, Allegro
- Admiral
- Posts: 2459
- Joined: Fri Jan 02, 2004 6:41 pm
- Sailboat: MacGregor 26X
- Location: Bellevue, Wa '96 26x, Tohatsu 90 TLDI and Plug In Hybrid Electric drive
- Contact:
Re: Potable Water and Epoxy
The supply tube is simply cable tied to the stiff piece of plastic at a few places. The plastic starts just inside the cap and reaches to the bottom of the tank. To change to the other tank you simply unscrew the ring around the cap with the tube through it and move the whole cap, dip tube assembly to the full tank. Usually it stays primed, if not a squeeze or two on the bulb get the water flowing and the pump primed again. I do not open the tank vents at all. The tubing passing through what was the opening spigot of the cab has enough slop that air gets into the tank with no problem. I've never had a collapsed tank issue.
I'll try and snap a better shot of the assembly and post it.
I'll try and snap a better shot of the assembly and post it.
-
Sumner

- Admiral
- Posts: 2375
- Joined: Sun Jan 04, 2009 3:20 pm
- Sailboat: MacGregor 26S
- Location: SE Utah
- Contact:
Re: Potable Water and Epoxy
Ok I'll throw ours in there in case there is a non X or M sailor reading this. It is pretty similar to the last couple ones posted except for a few differences. One is we don't have an electric pump as I have one in our teardrop and it wastes too much water for us on a longer trip where we can't replenish our water. We replaced the failing orginal pump with a Valterra hand pump and love it. It is easy to pump and holds it prime. We try and get by with about a gallon a day usage and carry about 30 gallons on a trip like our one to Lake Powell where we planned around 30 days out without replenishing. We went 18 and ended up with a lot of water.
We also use the Reliance water containers, We have two main 7 gallon ones and 4 of the 3 gallon ones and then have some gallon containers of water also to add what ever else we need.
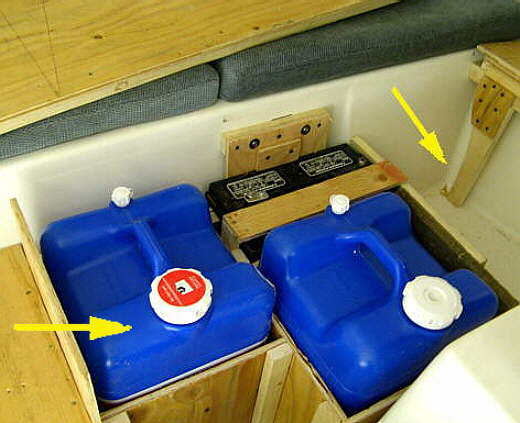
One of the 7 gallon containers (left one above) stays in place and...............
............. is plumbed to the pump on the sink (it could be electric if you wanted). They are boxed in under the extended V-Berth.
Two of the 3 gallon containers are boxed in and kept under .......
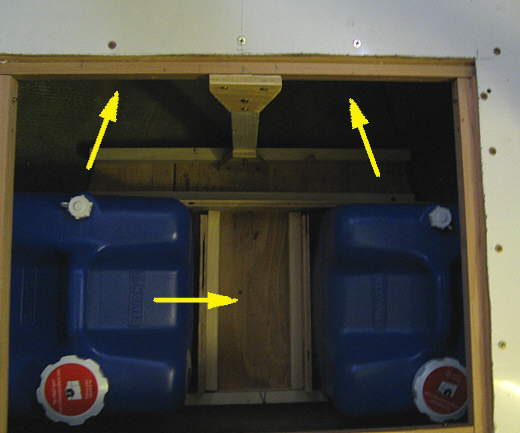
....the V-berth right in front of the 2 7 gallon containers. The other 2 3 gallon containers are kept loose at the back of the aft berth which we don't use for sleeping. We use the 3 gallon containers due to the fact that the 7 gallon are just too heavy for us to easily handle any more. I've had two hernia operations and would like to have no more. We use the loose containers first when the plumbed one is drawn down.
cont..... on ..... next .... post by me,
Sum
We also use the Reliance water containers, We have two main 7 gallon ones and 4 of the 3 gallon ones and then have some gallon containers of water also to add what ever else we need.
One of the 7 gallon containers (left one above) stays in place and...............
............. is plumbed to the pump on the sink (it could be electric if you wanted). They are boxed in under the extended V-Berth.
Two of the 3 gallon containers are boxed in and kept under .......
....the V-berth right in front of the 2 7 gallon containers. The other 2 3 gallon containers are kept loose at the back of the aft berth which we don't use for sleeping. We use the 3 gallon containers due to the fact that the 7 gallon are just too heavy for us to easily handle any more. I've had two hernia operations and would like to have no more. We use the loose containers first when the plumbed one is drawn down.
cont..... on ..... next .... post by me,
Sum
Last edited by Sumner on Fri Apr 09, 2010 2:57 pm, edited 1 time in total.
-
Sumner
- Admiral
- Posts: 2375
- Joined: Sun Jan 04, 2009 3:20 pm
- Sailboat: MacGregor 26S
- Location: SE Utah
- Contact:
Re: Potable Water and Epoxy
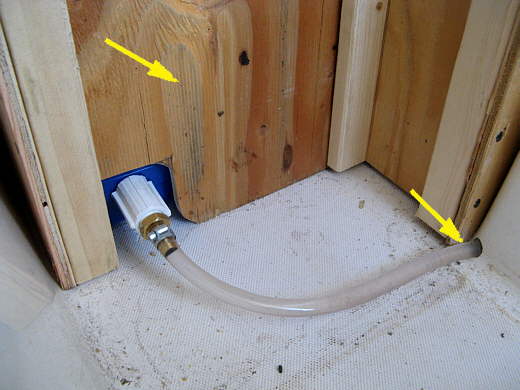
...........continued. We have two ways to refill the main 7 gallon container. One is to just take a 3 gallon jug from the aft berth and prop it over the opening to the 7 gallon and turn the spigot on and fill it. Also you don't have to worry about overfilling using the smaller 3 gallon container.
To fill from the other 7 gallon container I made a transfer pump.....
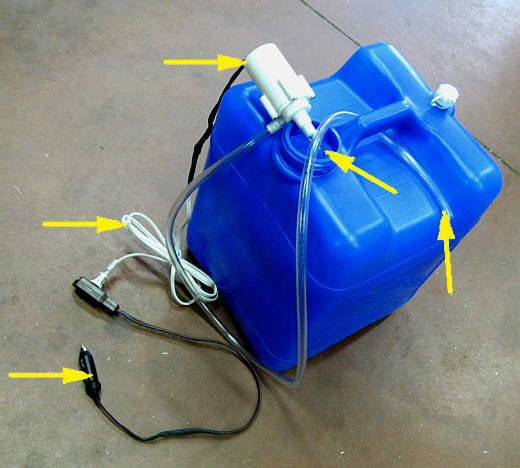
....setup out of the electric pump we could of used for the sink. I wired a cigarette lighter plug to the pump and have a pickup hose attached to the pump that goes down into the container we are drawing from and an outlet hose to the fixed container. Ruth turns the pump on from a switched outlet and I handle the hoses. I have to sometimes prime the pump by just sucking on the outlet hose. We use this setup to also draw from the two 3 gallon containers under the V-berth so I don't have to wrestle them out while they are full. Works really well and we fill the plumbed tank every 4-6 days usually on the water.
There are more.................
.....pictures and more detail here....
http://purplesagetradingpost.com/sumner ... ide-8.html
c ya,
Sum
To fill from the other 7 gallon container I made a transfer pump.....
....setup out of the electric pump we could of used for the sink. I wired a cigarette lighter plug to the pump and have a pickup hose attached to the pump that goes down into the container we are drawing from and an outlet hose to the fixed container. Ruth turns the pump on from a switched outlet and I handle the hoses. I have to sometimes prime the pump by just sucking on the outlet hose. We use this setup to also draw from the two 3 gallon containers under the V-berth so I don't have to wrestle them out while they are full. Works really well and we fill the plumbed tank every 4-6 days usually on the water.
There are more.................
.....pictures and more detail here....
http://purplesagetradingpost.com/sumner ... ide-8.html
c ya,
Sum
-
kmclemore
- Site Admin
- Posts: 6271
- Joined: Sun Feb 08, 2004 9:24 am
- Sailboat: MacGregor 26X
- Location: Ambler, PA -- MACX2018A898 w/ Suzuki DF60AV -- 78 BW Harpoon 4.6 -- 2018 Tahoe 550TF w/ 150 Merc
Re: Potable Water and Epoxy
Please remind me not to drink from your faucet.Sumner wrote:I have to sometimes prime the pump by just sucking on the outlet hose...
-
Sumner
- Admiral
- Posts: 2375
- Joined: Sun Jan 04, 2009 3:20 pm
- Sailboat: MacGregor 26S
- Location: SE Utah
- Contact:
Re: Potable Water and Epoxy
I thought someone would pick up on thatkmclemore wrote:Please remind me not to drink from your faucet.Sumner wrote:I have to sometimes prime the pump by just sucking on the outlet hose...
Sum
Our Trips to...
Our Mac Pages
Mac Links
-
The Mutt
- Captain
- Posts: 611
- Joined: Thu Nov 29, 2007 12:28 pm
- Sailboat: MacGregor 26X
- Location: Springwood, NSW, devinetemptations.com/macgregor26x.htm
- Contact:
Re: Potable Water and Epoxy
We have two 20 litre tanks in the forward V berth locker port side

The black tank holds fuel for cooking and heating

The hoses from the tanks go to taps so each tank can be individually switched on/off
the taps connect to the electric pump which then goes to taps on the galley and toilet sinks.

Glenn
The black tank holds fuel for cooking and heating
The hoses from the tanks go to taps so each tank can be individually switched on/off
the taps connect to the electric pump which then goes to taps on the galley and toilet sinks.
Glenn