

Next on the list of mods are new cabin cushions. I'm going to make them myself. Since it looks like we are going to launch soon, I'll need a home project.
I scanned the archives for fabric color ideas but all the old photos are gone.
I'd like to ask if anyone can post photos of their interior color scheme to help me get ideas?
Cushion replacement Part II
-
Starscream

- Admiral
- Posts: 1561
- Joined: Tue Nov 03, 2009 10:08 am
- Sailboat: MacGregor 26X
- Location: Montreal, Quebec. 2002 26X - Suzi DF90A
-
windypatrick

- Engineer
- Posts: 152
- Joined: Mon Jun 04, 2012 8:42 pm
- Sailboat: MacGregor 26X
- Location: Puerto Vallarta, MX
Re: Cushion replacement Part II
I just sent away for the Sail Rite fabric sampler book. You send $75, they loan it to you and give you back your funds (less shipping) when returned within 30 days. They also have a few sample books left of the prior year that you can purchase for $15. I told the Admiral that it was her opportunity for input (points gained!). 
Covid has delayed them a bit, the only downside is it may be a few weeks before you have it.
Best Regards!
P
Covid has delayed them a bit, the only downside is it may be a few weeks before you have it.
Best Regards!
P
-
NiceAft

- Admiral
- Posts: 6698
- Joined: Tue Feb 01, 2005 7:28 pm
- Sailboat: MacGregor 26M
- Location: Upper Dublin,PA, USA: 2005M 50hp.Honda4strk.,1979 Phantom Sport Sailboat, 9'Achilles 6HP Merc 4strk
Re: Cushion replacement Part II
On my M, I always liked the non clashy color that came from the factory. I did add some pizazz when I replaced the carpet. Grrrrrr 
Ray ~~_/)~~
-
Chinook

- Admiral
- Posts: 1730
- Joined: Sun Feb 26, 2006 7:20 pm
- Location: LeavenworthWA 2002 26x, Suzuki DF60A
Re: Cushion replacement Part II
I'm better at fabricating new cabin cushions than I am at moving photos around. Therefore, I'll direct you to my website: http://chinook.cecka.us, where, in the first entry (July 15, 2015) under Great Loop, you can view of the interior cushions my wife and I sewed up in preparation for our Great Loop trip. The fabric is Sunbrella, in a pleasing textured tan/beige color which works well with the mahogany woodwork I've installed. Using the old foam, I traced patterns on butcher paper, then took the patterns to a shop which sells quality foam for RV and boat cushions. We selected proper foam densities after doing "sit" and "recline" tests. They cut the foam pieces out according to pattern. We ordered sufficient yardage of Sunbrella on line, purchased a hot knife from Sailrite, followed the instructions on their online video, and went to work. Big job, but the results were great, and 5 years later, the cushions still look like new, and we can sit at the table or lay down in the Vee berth without bottoming out. Oh yeah, in addition to the Vee berth cushions, which have fairly firm foam, we bought a piece of memory foam, sewed up a cover for it, and use it as a topper. The combination makes for a very comfortable sleeping platform.
-
Starscream
- Admiral
- Posts: 1561
- Joined: Tue Nov 03, 2009 10:08 am
- Sailboat: MacGregor 26X
- Location: Montreal, Quebec. 2002 26X - Suzi DF90A
Re: Cushion replacement Part II
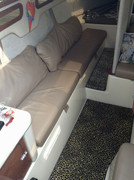
I started the cushion replacement project.
Here is what's hiding under 18-year old original cabin cushion covers:

I chose a light beige, neutral with a couple of flecks. I was going to go for a splash of color but I talked myself out of it. I used a breathable marine underliner fabric for the backs/bottoms.

It takes space to do this, and patience for the mess. It's a lot of work. I've done 5 of 6 cushions and my back hurts now. The 6th cushion will be part of the V-berth extension project, since it will be 4" and made out of the wal-mart mattress, whereas all the others are 3" like the original. I used high-density foam for the sitting parts and standard (i.e. cheap) foam for the back-rest parts. (Well that was my intention, but one back-rest got sitting-foam, and vice-versa cuz I wasn't paying attention). No ping-pong for the kids today.

ps please disregard the nerf bullets everywhere. Not part of the project.
Here is what's hiding under 18-year old original cabin cushion covers:
I chose a light beige, neutral with a couple of flecks. I was going to go for a splash of color but I talked myself out of it. I used a breathable marine underliner fabric for the backs/bottoms.
It takes space to do this, and patience for the mess. It's a lot of work. I've done 5 of 6 cushions and my back hurts now. The 6th cushion will be part of the V-berth extension project, since it will be 4" and made out of the wal-mart mattress, whereas all the others are 3" like the original. I used high-density foam for the sitting parts and standard (i.e. cheap) foam for the back-rest parts. (Well that was my intention, but one back-rest got sitting-foam, and vice-versa cuz I wasn't paying attention). No ping-pong for the kids today.
ps please disregard the nerf bullets everywhere. Not part of the project.
-
Starscream
- Admiral
- Posts: 1561
- Joined: Tue Nov 03, 2009 10:08 am
- Sailboat: MacGregor 26X
- Location: Montreal, Quebec. 2002 26X - Suzi DF90A
Re: Cushion replacement Part II
Oh, and can anyone spot the major screw-up on one of the cushions on the second photo? You would need to have an X to know what it is.
-
Jimmyt

- Admiral
- Posts: 3402
- Joined: Sat Jul 18, 2015 9:52 am
- Sailboat: MacGregor 26M
- Location: Mobile AL 2013 26M, 60 Etec
Re: Cushion replacement Part II
Those look great! You do good work!
Did you make the zipper slot too long? Just a guess.
Did you make the zipper slot too long? Just a guess.
Jimmyt
P-Cub-Boo
2013 26M, Etec 60, roller Genoa, roller main
Cruising Waters: Mobile Bay, Western Shore, Fowl River
P-Cub-Boo
2013 26M, Etec 60, roller Genoa, roller main
Cruising Waters: Mobile Bay, Western Shore, Fowl River
-
Starscream
- Admiral
- Posts: 1561
- Joined: Tue Nov 03, 2009 10:08 am
- Sailboat: MacGregor 26X
- Location: Montreal, Quebec. 2002 26X - Suzi DF90A
Re: Cushion replacement Part II
Nope...good guess but there's no way you could know without having an X.
Here's the repair: 1 hour of seam-ripping and re-assembly after adding the back-pocket on the right side (so that the zipper faces down). The back-pocket slides onto the seat back to hold it in position and I sewed it on the wrong side originally. Now there's a pocket on both sides, but that will make it easier to add the snap in the right position when the cushions get back on board.

I unwrapped the walmart mattress yesterday and left it open to expand. It's really not doing a good job of finding its actual dimensions. We'll see what another few days will do. Plus, it said 74x78 on the box but it's actually 72x78. Still more than enough for my purposes but not a quality product.
Oh...does anyone want the original cushion covers or V-berth covers? I hate to throw things out. I suppose a good hot-water wash would take care of the mold, but the admiral would kill me if I put them in our machine. The moldy foam is going straight to the landfill, sadly. When I was young I would have loved to have that foam: would have cut them into goalie pads for street hockey and tied them on with string, but now every kid has actual goalie pads.
Here's the repair: 1 hour of seam-ripping and re-assembly after adding the back-pocket on the right side (so that the zipper faces down). The back-pocket slides onto the seat back to hold it in position and I sewed it on the wrong side originally. Now there's a pocket on both sides, but that will make it easier to add the snap in the right position when the cushions get back on board.
I unwrapped the walmart mattress yesterday and left it open to expand. It's really not doing a good job of finding its actual dimensions. We'll see what another few days will do. Plus, it said 74x78 on the box but it's actually 72x78. Still more than enough for my purposes but not a quality product.
Oh...does anyone want the original cushion covers or V-berth covers? I hate to throw things out. I suppose a good hot-water wash would take care of the mold, but the admiral would kill me if I put them in our machine. The moldy foam is going straight to the landfill, sadly. When I was young I would have loved to have that foam: would have cut them into goalie pads for street hockey and tied them on with string, but now every kid has actual goalie pads.
-
ris

- Captain
- Posts: 703
- Joined: Sat Feb 28, 2015 4:27 pm
- Sailboat: MacGregor 26X
- Location: Frostproof Florida
Re: Cushion replacement Part II
We washed the old cushion covers twice and they still smelled. Throw them out
Your cushions look nice
Richard
Your cushions look nice
Richard
-
Starscream
- Admiral
- Posts: 1561
- Joined: Tue Nov 03, 2009 10:08 am
- Sailboat: MacGregor 26X
- Location: Montreal, Quebec. 2002 26X - Suzi DF90A
Re: Cushion replacement Part II
Thanks guys,
For the record, I used 5 yards of fabric for all the interior cushion tops and sides (fabric was 60" wide with a usable width of 58"), and 2.5 yards of the marine underliner (which was 54" wide) for the cushion bottoms. With planning there is minimal wastage but don't underestimate how much material it takes for the cushion boxing (sides).
I really don't like the Walmart mattress topper so far. It doesn't re-take its shape very fast so the cushion I made out of it (remember the V-berth extension project) doesn't spring back into shape.
-
Starscream
- Admiral
- Posts: 1561
- Joined: Tue Nov 03, 2009 10:08 am
- Sailboat: MacGregor 26X
- Location: Montreal, Quebec. 2002 26X - Suzi DF90A
Re: Cushion replacement Part II
I learned something today. When fabricating a non-symmetrical cushion with fabric that has different top and bottom layers, then if you don't think things through perfectly you have a 50-50 chance of placing the foam down on the wrong side to trace it out.
In good québecois french: Tabarnak!
Have to remake. Even after I saw it, I figured I had just installed the foam backwards somehow and I'd just flip the foam inside the cover...but nope. My brain just couldn't accept why it was wrong, or how I could be such an idiot. After sketching it out, it's obvious that I placed the foam top-side down on the top-side of the top fabric to trace it. The bottom mesh doesn't make a difference because it can be installed either way.

The two bench cushions just before the V-berth are now 4" walmart mattress topper, half memory foam, half regular foam. I don't like the material very much because it doesn't spring back very fast, and it makes the cushion covers look loose after one has just been crawling around on them, cursing their own stupidity. But overall the V-berth extension feels really comfortable, and the joint between the V-cushion and the seat cushion falls right on the neckline so it's not noticeable (yet...haven't tried sleeping, just a test-fit.). I may add a velcro holder-strip between the V and the bench cushions to hold them in place during use.
Live and learn. While I'm waiting for the new fabric to arrive, I fabricated another sail-cover in black sunbrella to match the UV cover on the new jib. Also made it a bit bigger than the already bigger one I made last year, since the new sail is SOOO much thicker than the originals. Now I have two unused sailcovers, both in Navy blue, one tiny original and one that's a very tight squeeze over the new sails. These are also up for grabs if anyone wants one.
On the weird side, I've never been able to get into my boat in January before. Gotta love climate change.
In good québecois french: Tabarnak!
Have to remake. Even after I saw it, I figured I had just installed the foam backwards somehow and I'd just flip the foam inside the cover...but nope. My brain just couldn't accept why it was wrong, or how I could be such an idiot. After sketching it out, it's obvious that I placed the foam top-side down on the top-side of the top fabric to trace it. The bottom mesh doesn't make a difference because it can be installed either way.
The two bench cushions just before the V-berth are now 4" walmart mattress topper, half memory foam, half regular foam. I don't like the material very much because it doesn't spring back very fast, and it makes the cushion covers look loose after one has just been crawling around on them, cursing their own stupidity. But overall the V-berth extension feels really comfortable, and the joint between the V-cushion and the seat cushion falls right on the neckline so it's not noticeable (yet...haven't tried sleeping, just a test-fit.). I may add a velcro holder-strip between the V and the bench cushions to hold them in place during use.
Live and learn. While I'm waiting for the new fabric to arrive, I fabricated another sail-cover in black sunbrella to match the UV cover on the new jib. Also made it a bit bigger than the already bigger one I made last year, since the new sail is SOOO much thicker than the originals. Now I have two unused sailcovers, both in Navy blue, one tiny original and one that's a very tight squeeze over the new sails. These are also up for grabs if anyone wants one.
On the weird side, I've never been able to get into my boat in January before. Gotta love climate change.
-
Jimmyt
- Admiral
- Posts: 3402
- Joined: Sat Jul 18, 2015 9:52 am
- Sailboat: MacGregor 26M
- Location: Mobile AL 2013 26M, 60 Etec
Re: Cushion replacement Part II
Well, if that's the worst mistake you've made, you're living a charmed life.
On the upside, the rest of them look excellent!
Extension looks great, too.
On the upside, the rest of them look excellent!
Extension looks great, too.
Jimmyt
P-Cub-Boo
2013 26M, Etec 60, roller Genoa, roller main
Cruising Waters: Mobile Bay, Western Shore, Fowl River
P-Cub-Boo
2013 26M, Etec 60, roller Genoa, roller main
Cruising Waters: Mobile Bay, Western Shore, Fowl River
-
Inquisitor

- Captain
- Posts: 926
- Joined: Mon Apr 23, 2007 5:24 pm
- Sailboat: MacGregor 26M
- Location: North Carolina Mountains
Re: Cushion replacement Part II
This is an inspiration! 
I'm just hoping your skill level isn't too much better than my lack of sewing skills. I really can't stand the vinyl covering in the M. The sweaty feel and the air blowing out of them every time someone sits on them. And don't even get me started on those back rests cushions. I'm a thousand miles south of you and I'm not getting out in my boat in the yard in this cold, so I need an indoor project and this one just rose to the top!
 Sorry for the whine and cheese.
 I've ordered some cloth samples to pick colors, check for water resistance and see if my sewing machine can handle this fabric. I've also started watching the SailRight videos on cushion making.
I'm just hoping your skill level isn't too much better than my lack of sewing skills. I really can't stand the vinyl covering in the M. The sweaty feel and the air blowing out of them every time someone sits on them. And don't even get me started on those back rests cushions. I'm a thousand miles south of you and I'm not getting out in my boat in the yard in this cold, so I need an indoor project and this one just rose to the top!
Odysseus, expert on the Siren's call
-
Starscream
- Admiral
- Posts: 1561
- Joined: Tue Nov 03, 2009 10:08 am
- Sailboat: MacGregor 26X
- Location: Montreal, Quebec. 2002 26X - Suzi DF90A
Re: Cushion replacement Part II
Appreciate the feedback.
I watched the sailrite videos too, but they were too much. I ended up referring to this video: https://www.youtube.com/watch?v=Gw_40jnjZBE. In this video the cushion is small enough that three sides of the cushion are made with two pieces of boxing, but most of mine were made with four.
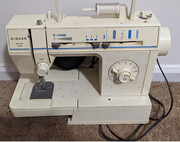
I have a hard time believing that ANY sewing machine couldn't do box cushions, even in Sunbrella. I use this machine, available at Costco and Amazon for not too much:

It has no problem with hemmed sunbrella and a zipper, or two layers of webbing and two layers of sunbrella. It sometimes needs a little helping push on the wheel, and I've broken four needles so far, but overall it's doing a fine job.
A few things that I learned that weren't mentioned in the video:
1) When sewing the zipper closed ( the seam that you rip out after ), sew the first few inches with a short stitch, but when you are sewing the part that will be ripped, increase the stitch length to maximum. It's really hard to rip out the short stitches and you risk damaging the fabric.
2) Hot-knife cutting is waaaaay better than scissor cutting, ESPECIALLY on sunbrella fabric.
3) With the heavier UV marine threads, the bobbin-winding process is really important. You have to get it tight, because the thread slips on itself and doesn't hold the "wind" very well. Near the end of the bobbin the thread can start to jam, really frustrating, until I figured out the cause. When that happens, I just take out the bobbin and re-fill it, wound tight.
4) When you have finished cutting the boxing and are ready to sew them together, you start with the zipper piece and one of the side pieces. It is REALLY important to choose the proper side piece to start with (the left one or the right one). If you choose the correct one, the cushion top piece will be on your left later on when you are attaching it to the boxing, so it doesn't have to pass under the machine arm. If you choose the incorrect one, when you come to attach the top piece everything will be on your RIGHT when sewing, and have to pass under the sewing machine arm. It's really hard to think it forward and start attaching the boxing pieces in the correct order.
I actually enjoyed this project a lot. So much that I'm thinking about the cockpit cushions next. For that, I have to decide on the foam and fabric. I've read the archives here, and I know we have a professional designer on this forum who recommends sunbrella and closed-cell foam, but I've seen a couple of recommendations that suggest an alternate route. Sailrite says: https://www.sailrite.com/outdoor-cushio ... oam-thread and now I'm leaning towards this foam https://www.jtsoutdoorfabrics.com/Outdo ... 19050.html with a phifertex mesh https://www.jtsoutdoorfabrics.com/Phife ... 12371.html as the bottom panel and Sunbrella outdoor furniture fabric as the top and sides: https://www.jtsoutdoorfabrics.com/Sunbr ... _3263.html. YKK zippers, https://www.jtsoutdoorfabrics.com/5-YKK ... 17265.html. The idea is that everything is mold/mildew resistant, and more or less open-bottom for the cushions. The foam won't wick and the bottom mesh should allow everything to air out. The alternative is just seal everything up with Sunbrella coated with 303, but with that method any water that does get in will have a really hard time getting back out, too.
I watched the sailrite videos too, but they were too much. I ended up referring to this video: https://www.youtube.com/watch?v=Gw_40jnjZBE. In this video the cushion is small enough that three sides of the cushion are made with two pieces of boxing, but most of mine were made with four.
I have a hard time believing that ANY sewing machine couldn't do box cushions, even in Sunbrella. I use this machine, available at Costco and Amazon for not too much:
It has no problem with hemmed sunbrella and a zipper, or two layers of webbing and two layers of sunbrella. It sometimes needs a little helping push on the wheel, and I've broken four needles so far, but overall it's doing a fine job.
A few things that I learned that weren't mentioned in the video:
1) When sewing the zipper closed ( the seam that you rip out after ), sew the first few inches with a short stitch, but when you are sewing the part that will be ripped, increase the stitch length to maximum. It's really hard to rip out the short stitches and you risk damaging the fabric.
2) Hot-knife cutting is waaaaay better than scissor cutting, ESPECIALLY on sunbrella fabric.
3) With the heavier UV marine threads, the bobbin-winding process is really important. You have to get it tight, because the thread slips on itself and doesn't hold the "wind" very well. Near the end of the bobbin the thread can start to jam, really frustrating, until I figured out the cause. When that happens, I just take out the bobbin and re-fill it, wound tight.
4) When you have finished cutting the boxing and are ready to sew them together, you start with the zipper piece and one of the side pieces. It is REALLY important to choose the proper side piece to start with (the left one or the right one). If you choose the correct one, the cushion top piece will be on your left later on when you are attaching it to the boxing, so it doesn't have to pass under the machine arm. If you choose the incorrect one, when you come to attach the top piece everything will be on your RIGHT when sewing, and have to pass under the sewing machine arm. It's really hard to think it forward and start attaching the boxing pieces in the correct order.
I actually enjoyed this project a lot. So much that I'm thinking about the cockpit cushions next. For that, I have to decide on the foam and fabric. I've read the archives here, and I know we have a professional designer on this forum who recommends sunbrella and closed-cell foam, but I've seen a couple of recommendations that suggest an alternate route. Sailrite says: https://www.sailrite.com/outdoor-cushio ... oam-thread and now I'm leaning towards this foam https://www.jtsoutdoorfabrics.com/Outdo ... 19050.html with a phifertex mesh https://www.jtsoutdoorfabrics.com/Phife ... 12371.html as the bottom panel and Sunbrella outdoor furniture fabric as the top and sides: https://www.jtsoutdoorfabrics.com/Sunbr ... _3263.html. YKK zippers, https://www.jtsoutdoorfabrics.com/5-YKK ... 17265.html. The idea is that everything is mold/mildew resistant, and more or less open-bottom for the cushions. The foam won't wick and the bottom mesh should allow everything to air out. The alternative is just seal everything up with Sunbrella coated with 303, but with that method any water that does get in will have a really hard time getting back out, too.
-
Inquisitor
- Captain
- Posts: 926
- Joined: Mon Apr 23, 2007 5:24 pm
- Sailboat: MacGregor 26M
- Location: North Carolina Mountains
Re: Cushion replacement Part II
Fantastic!Starscream wrote: ↑Sat Jan 16, 2021 6:56 am Appreciate the feedback.
I watched the sailrite videos too, but they were too much. I ended up referring to this video: https://www.youtube.com/watch?v=Gw_40jnjZBE. In this video the cushion is small enough that three sides of the cushion are made with two pieces of boxing, but most of mine were made with four.
I have a hard time believing that ANY sewing machine couldn't do box cushions, even in Sunbrella. I use this machine, available at Costco and Amazon for not too much:
...
For me, it was a very helpful video. I was afraid I'd have to figure out how to do a zipper. You also give me hope that this old tank will be usable. It's over 30 years old, been in half a dozen moves between four states and in the attic 99% of its life. Someone gave it to my Ex. I got it in the divorce because the ten pants I hemmed was ten-times more than she used it. She wasn't ever going to do "women's work". For me... it was a tool... just like table saw. Now I have to find all those parts that came with the sewing machine. Now, I know what some of those pieces are for... "who knew"... a Zipper Foot!
A few things that I learned that weren't mentioned in the video:
1) When sewing the zipper closed ( the seam that you rip out after ), sew the first few inches with a short stitch, but when you are sewing the part that will be ripped, increase the stitch length to maximum. It's really hard to rip out the short stitches and you risk damaging the fabric.
2) Hot-knife cutting is waaaaay better than scissor cutting, ESPECIALLY on sunbrella fabric.
3) With the heavier UV marine threads, the bobbin-winding process is really important. You have to get it tight, because the thread slips on itself and doesn't hold the "wind" very well. Near the end of the bobbin the thread can start to jam, really frustrating, until I figured out the cause. When that happens, I just take out the bobbin and re-fill it, wound tight.
4) When you have finished cutting the boxing and are ready to sew them together, you start with the zipper piece and one of the side pieces. It is REALLY important to choose the proper side piece to start with (the left one or the right one). If you choose the correct one, the cushion top piece will be on your left later on when you are attaching it to the boxing, so it doesn't have to pass under the machine arm. If you choose the incorrect one, when you come to attach the top piece everything will be on your RIGHT when sewing, and have to pass under the sewing machine arm. It's really hard to think it forward and start attaching the boxing pieces in the correct order.
- Got it. Check!
- Hot-knife - I have one, never been out of the box. I would never have thought to use it on cloth. Do you use the hot-knife on the foam also or cut it... like she did with a knife?
- Thread - I'm not sure I'd have known to try that when it jams. I'd assume my machine is broke.
 I see all different kinds on the SailRight sight and others. Different materials and different weights. Which thread did you use?
 - I think I get the gist. Avoid having to pass all the fabric under the arm.
I purchased the optional cockpit cushions when new, but some day... I have big plans for the cockpit and will need different cushions. I've bookmarked this post with a note-to-self.I actually enjoyed this project a lot. So much that I'm thinking about the cockpit cushions next. For that, I have to decide on the foam and fabric. I've read the archives here, and I know we have a professional designer on this forum who recommends sunbrella and closed-cell foam, but I've seen a couple of recommendations that suggest an alternate route. Sailrite says: https://www.sailrite.com/outdoor-cushio ... oam-thread and now I'm leaning towards this foam https://www.jtsoutdoorfabrics.com/Outdo ... 19050.html with a phifertex mesh https://www.jtsoutdoorfabrics.com/Phife ... 12371.html as the bottom panel and Sunbrella outdoor furniture fabric as the top and sides: https://www.jtsoutdoorfabrics.com/Sunbr ... _3263.html. YKK zippers, https://www.jtsoutdoorfabrics.com/5-YKK ... 17265.html. The idea is that everything is mold/mildew resistant, and more or less open-bottom for the cushions. The foam won't wick and the bottom mesh should allow everything to air out. The alternative is just seal everything up with Sunbrella coated with 303, but with that method any water that does get in will have a really hard time getting back out, too.
FYI - I know its the "go-to" for marine cloth, but I'm looking into something else beside Sunbrella... mainly for price, but also, I'd like to use US made stuff (when I can). The Olefin I'm trying is manufactured here in North Carolina. I have 10 samples coming (I was surprised they were free) of different colors and different double rub ratings: 50k, 75k and 100k.
Last edited by Inquisitor on Sun Jan 17, 2021 2:03 am, edited 1 time in total.
Odysseus, expert on the Siren's call