

Telegraphing of defects is a major issue with any flexible flooring system. As you noted, your best bet is to sand and/or feather out defects with epoxy or other thick coating system before laying the floor. What type of adhesive did you use for the linoleum (which is probably vinyl sheet, by the way)?
I’m also a fan of the hammered paints. Application can be tricky on plastics, though. Did you prime or direct apply?
Inqism-05: The Throne Room
-
Inquisitor

- Captain
- Posts: 926
- Joined: Mon Apr 23, 2007 5:24 pm
- Sailboat: MacGregor 26M
- Location: North Carolina Mountains
Re: Inqism-05: The Throne Room
My first exposure with Linoleum. I sure hope you're not going to tell me I screwed the pooch.Idiotfool wrote: ↑Sat Apr 03, 2021 6:58 am Telegraphing of defects is a major issue with any flexible flooring system. As you noted, your best bet is to sand and/or feather out defects with epoxy or other thick coating system before laying the floor. What type of adhesive did you use for the linoleum (which is probably vinyl sheet, by the way)?
I’m also a fan of the hammered paints. Application can be tricky on plastics, though. Did you prime or direct apply?
Linoleum - https://www.lowes.com/pd/Armstrong-Floo ... 1000209647
Glue - https://www.lowes.com/pd/TEC-Stick-N-St ... t/50064107
Paint - I direct applied. I use thinned ABS/Acetone on just about everything I make. Never glue. I've stress tested several items (on purpose and accidentally
Odysseus, expert on the Siren's call
-
Inquisitor
- Captain
- Posts: 926
- Joined: Mon Apr 23, 2007 5:24 pm
- Sailboat: MacGregor 26M
- Location: North Carolina Mountains
Rocket Powered
3D Printed Spacer that goes in the window portion to extend it out flush to the interior fiberglass.

Internal AirHead 90°bend with integrated fan.
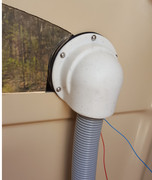
Exit Duct
I see a few enhancements needed...
Internal AirHead 90°bend with integrated fan.
Exit Duct
I see a few enhancements needed...
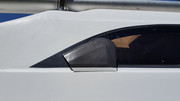
- Must have gotten the 6 holes cocked a few degrees from vertical on the boat. Back of exhaust is hanging too far off the side of the boat.
- Might want to enlarge it so the top diagonal line is a continuation of either the window or the raccoon stripe.
- Do a better job of paint matching the raccoon stripe.
- Igniter for afterburner thrust.

Odysseus, expert on the Siren's call
-
OverEasy
- Admiral
- Posts: 2885
- Joined: Mon Sep 28, 2020 11:16 am
- Sailboat: MacGregor 26X
- Location: NH & SC
Re: Inqism-05: The Throne Room
All kidding aside I think it looks great!
The painting makes it look like it was made for it..... wait.... ..... It Was Made For It!!!

The painting makes it look like it was made for it..... wait....
 ..... It Was Made For It!!!
-
Idiotfool
- Engineer
- Posts: 173
- Joined: Sun Aug 07, 2016 5:44 pm
- Sailboat: MacGregor 26M
- Location: Homestead, FL
Re: Inqism-05: The Throne Room
Yea, sheet vinyl, though everyone calls it "linoleum" colloquially. "Linoleum has largely been replaced as a floor covering by polyvinyl chloride (PVC), which is often colloquially but incorrectly called linoleum or lino. PVC has similar flexibility and durability to linoleum, but also has greater brightness and translucency, and is relatively less flammable." I can't tell what kind of wear layer your stuff has, or how thick it is, but I think you're probably fine. Just try not to drop or rest anything sharp or pointy in there - that's the bane of sheet vinyl's existence.Inquisitor wrote: ↑Sat Apr 03, 2021 7:52 amMy first exposure with Linoleum. I sure hope you're not going to tell me I screwed the pooch.Idiotfool wrote: ↑Sat Apr 03, 2021 6:58 am Telegraphing of defects is a major issue with any flexible flooring system. As you noted, your best bet is to sand and/or feather out defects with epoxy or other thick coating system before laying the floor. What type of adhesive did you use for the linoleum (which is probably vinyl sheet, by the way)?
I’m also a fan of the hammered paints. Application can be tricky on plastics, though. Did you prime or direct apply?
Linoleum - https://www.lowes.com/pd/Armstrong-Floo ... 1000209647
Glue - https://www.lowes.com/pd/TEC-Stick-N-St ... t/50064107
I really hate the Lowe's website - the information is so lacking. Nothing to be found on your adhesive. If you were instructed to trowel the adhesive down until it became tacky but didn't come off on your finger, that's a pressure sensitive adhesive. Fairly susceptible to moisture but, cut to size, sheet vinyl isn't really going to move enough to allow ingress. If you're concerned, you might want to caulk the edge-line, even if you rolled the flooring up the wall a little as flashing. I would've recommended a wet set over a PSA, though, for added durability and piece of mind. You would've been told to trowel the adhesive on and to immediately install the sheet vinyl afterwards, along with some statement of working time.
PSA is always mobile and wet set adhesives are more like a traditional glue, where it dries and becomes fairly solid, though waterborne adhesives will have limited flexibility that an epoxy adhesive would not have. With a wet adhesive, if you were light in areas, you'll always have a void while a PSA can always be encouraged to bond with a little weighted persuasion. A wet adhesive is both easier and harder to remove - a PSA will be gummy, like contact cement, even after years. A wet set will be like wood glue and you can scrape or sand it off.
The acetone is present in pretty much all aerosol paints to thin them out enough to aerosolize. The hammered finish is achieved from intentional contamination of particular additive that causes the paint to push away and crater. A lot of aerosol paints have difficulty adhering to plastics and a paint that has inherent cratering is going to be slightly compromised in bonding to plastics. On a printed part, though, I think your porosity and surface area should be okay for a direct application, though I believe you'd do even better with a primer, first. Not sure if I'd go automotive primer or a regular aerosol primer, though.Paint - I direct applied. I use thinned ABS/Acetone on just about everything I make. Never glue. I've stress tested several items (on purpose and accidentally) and they always break in other places besides the Acetone joint. I noted the spray paint contained Acetone... so I just figured, it'd probably fuse better than any other paint (or primer). As much abuse as this part will see in the sun, water spray, it'll certainly be the acid test of all time. It fails in a season... I re-group, re-think, ask questions here. If it fails in five seasons... I print another at a $1.50.

TLDR: I asked because I was curious, not that I was overly concerned.
-
Inquisitor
- Captain
- Posts: 926
- Joined: Mon Apr 23, 2007 5:24 pm
- Sailboat: MacGregor 26M
- Location: North Carolina Mountains
Re: Inqism-05: The Throne Room
I appreciate your information. Its always good to learn something to know what to expect down the road... even if were to have been bad news.Idiotfool wrote: ↑Sat Apr 03, 2021 10:02 pm ... I can't tell what kind of wear layer your stuff has, or how thick it is, but I think you're probably fine. Just try not to drop or rest anything sharp or pointy in there - that's the bane of sheet vinyl's existence.
...
PSA is always mobile and wet set adhesives are more like a traditional glue, where it dries and becomes fairly solid, though waterborne adhesives will have limited flexibility that an epoxy adhesive would not have. With a wet adhesive, if you were light in areas, you'll always have a void while a PSA can always be encouraged to bond with a little weighted persuasion. A wet adhesive is both easier and harder to remove - a PSA will be gummy, like contact cement, even after years. A wet set will be like wood glue and you can scrape or sand it off.
...
TLDR: I asked because I was curious, not that I was overly concerned.
Vinyl Sheet - I definitely picked it just for cosmetic reasons and that it felt a little "padded". It also attempts to have a slight texture of the stone veins and grout lines. Hoped it would be more comfortable to bare feet and maybe even a little sound-deadening. Although this head will be a shower and the Water Protection only said "Water Resistant", I hope it won't be a problem. The water shouldn't pool as I have about a 4° slope toward the sump when the boat is level... which will be rarely.
Glue - Although it said to use a trowel, I just use a spatula and spread it very thin. It seems to be very forgiving. I can lay it down and peel it back up to move it yet after several days it seems to be quite well stuck down. Even after days it seems to have a consistency of silicone calk. At one point I needed to mate an edge and I read where its better to just overlap the pieces and cut through both so they'll mate up. Pulling up the 3 day old trimmed edge was do-able, but came apart in pieces. The glue is stronger than the vinyl. The glue also is a big pain to clean off tools when freshly wet or cured. Its certainly not like epoxy, bondo or wood glue that can easily be chiseled off. This stuff is tenacious. Fortunately, I'm using plastic trowels... I'll just chuck them.
Odysseus, expert on the Siren's call
-
Inquisitor
- Captain
- Posts: 926
- Joined: Mon Apr 23, 2007 5:24 pm
- Sailboat: MacGregor 26M
- Location: North Carolina Mountains
Not Teak
I really wanted to make a traditional teak sump grate. But... somewhere here I documented a bad eBay experience and sticker shock of buying some teak. It would have cost as much as all the other building materials of the head. PUNT! As I am running down to the wire for getting to the Mug Race, I don't really have the time to figure the next best material. So for at least a temporary solution, I turned to... wait for it... the 3D Printer. It's real satisfying to know its working while I'm doing something else. My little helper.
The model took all of five minutes to make. Simply take a snap-shot of the region with my phone and trace it in the CAD program and set the thickness to be exactly what I need... about 0.9 inches.

Have to print it in three pieces since the printer is only so big.
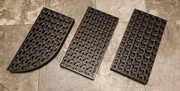
The pattern isn't something I had to "draw up". For those of you new to 3D Printing, the Slicing software (think of it like a printer driver) can fill interior volumes with a pattern so you don't have to fill it completely with plastic. For structural things it will make a completely water proof, 3 dimensional honeycomb core. Very strong. In this case, I opted for a more cosmetic pattern. The wavy pattern seems to be quite rigid, yet leave a convoluted path through. IOWs, you can't see through to the sump, but water will pass through.
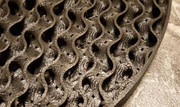
We'll see how it turns out. If it fails or if hair becomes a problem... I'll do something else. I spent far more time putting this post together than I spent making the grate.
The model took all of five minutes to make. Simply take a snap-shot of the region with my phone and trace it in the CAD program and set the thickness to be exactly what I need... about 0.9 inches.
Have to print it in three pieces since the printer is only so big.
The pattern isn't something I had to "draw up". For those of you new to 3D Printing, the Slicing software (think of it like a printer driver) can fill interior volumes with a pattern so you don't have to fill it completely with plastic. For structural things it will make a completely water proof, 3 dimensional honeycomb core. Very strong. In this case, I opted for a more cosmetic pattern. The wavy pattern seems to be quite rigid, yet leave a convoluted path through. IOWs, you can't see through to the sump, but water will pass through.
We'll see how it turns out. If it fails or if hair becomes a problem... I'll do something else. I spent far more time putting this post together than I spent making the grate.
Odysseus, expert on the Siren's call
-
OverEasy
- Admiral
- Posts: 2885
- Joined: Mon Sep 28, 2020 11:16 am
- Sailboat: MacGregor 26X
- Location: NH & SC
Re: Inqism-05: The Throne Room
Hi!
If you hadn’t already mentioned that you were applying fiberglass and resin to the wood underneath it would have been worrisome about the vinyl being water resistant.
In a house application I helped with back in the 1980s a previous owner had put vinyl flooring on a wood subfloor and applied PSA adhesive thinking it would protect the plywood I guess. When we went to remodel the bathroom the plywood was delaminating and unsound as water hood permeated through the vinyl into the wood in multiple locations. This was in front of the shower location, in front of the sink and in the middle of the floor. It didn’t appear to be an edge leak issue but rather a permeation through the vinyl issue. The vinyl was in good shape and wasn’t worn through or anything like that. (Now it was rather garish with swirly sparkly goldy silvery bluey greeny swirly pattern that made one have vertigo...especially when one turned on the over bright lights with the mirrored floor to ceiling wall... It was somebody’s haven but didn’t last long with the new owners. I wonder why....)
In a small test you might want to try you might take a sample of what you have made and glue in place a collar of pvc pipe or something to hold water. Fill it with water and monitor how well to holds up. Just a thought.....
If you hadn’t already mentioned that you were applying fiberglass and resin to the wood underneath it would have been worrisome about the vinyl being water resistant.
In a house application I helped with back in the 1980s a previous owner had put vinyl flooring on a wood subfloor and applied PSA adhesive thinking it would protect the plywood I guess. When we went to remodel the bathroom the plywood was delaminating and unsound as water hood permeated through the vinyl into the wood in multiple locations. This was in front of the shower location, in front of the sink and in the middle of the floor. It didn’t appear to be an edge leak issue but rather a permeation through the vinyl issue. The vinyl was in good shape and wasn’t worn through or anything like that. (Now it was rather garish with swirly sparkly goldy silvery bluey greeny swirly pattern that made one have vertigo...especially when one turned on the over bright lights with the mirrored floor to ceiling wall... It was somebody’s haven but didn’t last long with the new owners. I wonder why....
)In a small test you might want to try you might take a sample of what you have made and glue in place a collar of pvc pipe or something to hold water. Fill it with water and monitor how well to holds up. Just a thought.....
-
Inquisitor
- Captain
- Posts: 926
- Joined: Mon Apr 23, 2007 5:24 pm
- Sailboat: MacGregor 26M
- Location: North Carolina Mountains
Re: Inqism-05: The Throne Room
That is a good idea and simple enough. Plenty of scraps around. It would be good to see if this newer, "Urethane Protect Layer" is any more pervious. They certainly advertise it in bathrooms... maybe not showers like I'm using it. Might have to try a second test where I add several layers of the floor polyurethane on top of the vinyl.OverEasy wrote: ↑Sun Apr 04, 2021 9:12 am Hi!
If you hadn’t already mentioned that you were applying fiberglass and resin to the wood underneath it would have been worrisome about the vinyl being water resistant.
In a house application I helped with back in the 1980s a previous owner had put vinyl flooring on a wood subfloor and applied PSA adhesive thinking it would protect the plywood I guess. When we went to remodel the bathroom the plywood was delaminating and unsound as water hood permeated through the vinyl into the wood in multiple locations. This was in front of the shower location, in front of the sink and in the middle of the floor. It didn’t appear to be an edge leak issue but rather a permeation through the vinyl issue. The vinyl was in good shape and wasn’t worn through or anything like that. (Now it was rather garish with swirly sparkly goldy silvery bluey greeny swirly pattern that made one have vertigo...especially when one turned on the over bright lights with the mirrored floor to ceiling wall... It was somebody’s haven but didn’t last long with the new owners. I wonder why....
In a small test you might want to try you might take a sample of what you have made and glue in place a collar of pvc pipe or something to hold water. Fill it with water and monitor how well to holds up. Just a thought.....
Odysseus, expert on the Siren's call
-
Idiotfool
- Engineer
- Posts: 173
- Joined: Sun Aug 07, 2016 5:44 pm
- Sailboat: MacGregor 26M
- Location: Homestead, FL
Re: Inqism-05: The Throne Room
Generally speaking, vinyl floors fail because of water intrusion through seams, damage, or edges. I had peel and stick tile fail on the floor of my first house because water from a leaky fridge got through the seams. When I worked for a vinyl flooring manufacturer, I saw some failures at the edge of the floor. If you caulk the edges with a bathroom rated silicone or silicone/latex mix, you should save yourself that headache. A PSA will soften greatly in the presence of moisture or heat, so be aware of that. It might embrittlement in the winter, too, so refrain from working in that area during cold spells, if you can avoid it.
Notched trowels in plastic are usually available in the flooring area of Lowe’s or Home Depot, for future reference. Usually, with a PSA, you want a minimum thickness, but you want notches in the trowel pattern so that, when it squishes, the adhesive has a place to go when it flashes out. It gives you a bit of extra help against telegraphing, too, by somewhat leveling out the surface. For textured flooring, though, there isn’t as much of a need.
All vinyl floors will have some short term denting properties, but it will generally relax and restore itself after 24 hours. The softer the floor, the deeper the depression, typically, but it will still recover. There’s an ASTM method for this and, yes, it came about because of office environments and secretaries wearing high heals and damaging early vinyl floors beyond its ability to self heal. No big box store will sell anything that can’t rebound after a fairly significant weight load, (400 psi, I think) so all should be good.
Urethane coatings are usually what you see on vinyl, but sometimes there’s a different film. The thicker this is, the more your floor is protected. Take a scrap and a flathead screwdiver and scratch the surface with progressively more pressure to get an idea of scratch resistance. If you have pvc pipe of various lengths, you can do a Phillips head screwdriver drop test. If you can drop a screwdiver tip from 2 feet without damaging the floor, you should be relatively safe from normal drop damage in almost every typical scenario. I think. Less than 6 inches, and I’d be very ginger with that floor...
-
OverEasy
- Admiral
- Posts: 2885
- Joined: Mon Sep 28, 2020 11:16 am
- Sailboat: MacGregor 26X
- Location: NH & SC
Re: Inqism-05: The Throne Room
Hi Inquisitor!
How are things going?
Haven’t heard from you in a while.
Hope you had a good summer season on the water and that the new roof is all settled down after a nice warm sunny summer.
So have you been able to finish out that great shower?
Again, hope all is well.
Best Regards,
Over Easy


How are things going?
Haven’t heard from you in a while.
Hope you had a good summer season on the water and that the new roof is all settled down after a nice warm sunny summer.
So have you been able to finish out that great shower?

Again, hope all is well.
Best Regards,
Over Easy


