Might I make a suggestion?
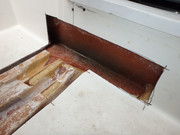
The problem I believe is more of an acoustic/cosmetic issue due to the overtime use deterioration of the thin fiberglass over soft ‘rubber’ foam technique that the factory originally employed to make the floor stiffener structure.
I do believe that MacGregor did design in an overall structural element tying the floor to the hull to a limited extent.
As MacGregor ‘did not’ carry this fully throughout the structure I would believe that it is of limited interface overall and primarily to give the floor a self leveling support at assembly of the interior floor shell to the hull shell. As such it isn’t a critical aspect to hull integrity or to the inner floor shell per-se.
That said I don’t believe it is necessary to cut open the floor to address the issue.
I believe that you can fix the problem with a proper application of a flexible filler foam. Preferably one that doesn’t retain water.
One material that comes to mind is “injectable isocyanurate foam” like that used to insulate basement walls. It is generally available at places like Home Depot, Lowe’s, Menards, etc…
Isocyanurate foam are relatively durable and yet are relatively rigid when cured.
An alternative would be the “GREAT STUFF POND FOAM” which is designed for water/wet environments and has a closed cell structure.
Yet another alternative is boat flotation foam which is a two part catalytic reaction foam but has to be poured in generally. When it ‘kicks-off’ it expands and conforms to the void space. This isn’t a problem generally unless constrained without an exit for the surplus to escape. (Note: If constrained it has the ability to actually jack up the floor and push down on the hull causing deformation or one, the other, or both


which generally isn’t a good idea.
The approach would be to access the “open” channels not currently filled with the original ‘rubber” foam.
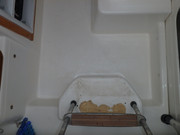
From looking at our Mac26X this can be done at either side of the interior floor as accessible from the battery-box/galley/bench on the port side. There is also access from the aft dinette bench/dinette floor/fwd dinette bench/ center access under the Vee-berth.
Once one has the spacing figured out of the non factory foam ribs one could drill small diameter access holes at either side and center of the interior walk way to insert the delivery tube for the injectable foam at roughly 6 inch or so I ntervals along the empty channels.
I would highly suggest you Firmly Apply a WIDE strip of painters tape to the floor prior to drilling the holes and leave it in place until finished injecting the foam. The tape gives you the ability to accurately mark hole locations and makes clean up much easier.
To inject the foam, Start at the center hole of a channel and inject enough foam until you see the expanding foam show up at the adjacent holes. Then skip over the adjacent hole and got to the next hole. Repeat working your way out from the center to ensure you actually fill the void but not over fill. Take your time and let the foam expand each time it is injected. Try not to over fill the void space. The foam needs to expand fully to cure properly. So you might want to work on several void channels in a sequence.
The side access give you opportunity to see that you have the foam expanded across the void channel.
NOTE: I’d suggest that you only fill the void channels involved with the felt floor softness or scrunchiness. You don’t want to make a situation where if water gets in the center section it is trapped.
- Let the foam fully cure for about 24 hours before cleaning up what has expanded through the holes.
Touching it while soft only makes a god awful mess.
- Use a couple layers of nitrile disposable gloves (that way you can peel off a dirty one and still have a clean one underneath to put a replacement glove over. Expandable foams LOVE to stick to human skin and doesn’t clean off well.
- Use a mask when drilling fiberglass and vacuum up dust as you go.
==>>PLEASE use a mask.
(I use a vacuum while drilling to avoid dust from the get go)
==>>Use safety glasses, PLEASE.
When done cleaning up make a small hollow at each injection hole about 1/8 to 1/4 inch deep into the foam.
Clean each hole surface area with a damp acetone rag (wear gloves and PPE and ventilate the area constantly with fresh air).
Have no ignition sources. Blow air INTO the cabin area so fumes DO NOT FLOW THROUGH THE FAN MOTOR.
Then you can use thinned white gel-coat in a disposable syringe (available from West Marine and other suppliers) to apply just enough mixed gel-coat to fill the hole to the top of floor surface texture. The gel-coat will generally cure flat or suck in a little and make your floor uniform without an extensive amount of fiberglass work. I’d just leave the filled holes alone after curing if you worked neatly.
Get a a beverage of your choice and sit back somewhere comfortable and realize you saved yourself a major fiberglassing headache and refinishing job that unless you do that stuff all the time is really hard to make blend in and not be noticeable forever.
The isocyanurate foam and the ‘GREAT STUUF POND FOAM” will last for decades.
Hope this helps.
Your boat/Your rules.
Regards,
Over Easy