

Replacing companionway & hatch slides
-
macowneril2015
- Engineer
- Posts: 193
- Joined: Tue Nov 10, 2015 5:51 pm
- Sailboat: MacGregor 26X
- Location: Downtown Chicago, 2001 26X, 2001 50 Hp Nissan (NS50D2)
Replacing companionway & hatch slides
I recently began attempting to replace my slides/ rails on the sliding hatch and companionway. I have ran into an issue primarily on the starboard slide on my 2000  . The issue is the bathroom bulkhead insert blocks access to to the plugs and bolts to remove them, I tried drilling a hole to get access to one but it is not feasible on the others. I know I will need to drill into liner for one of the sliding hatch ones and I have replacement plugs but any help or advice is appreciated.
-
WinSome

- Engineer
- Posts: 180
- Joined: Thu Jul 07, 2016 7:35 am
- Sailboat: MacGregor 26X
- Location: Hamilton Ontario Canada
Re: Replacing companionway & hatch slides
What is the issue you are trying to resolve? Our hatch slide was grinding and being difficult. We used one side of self/sticking industrial grade Velcro inserted under the hatch slide. Had great results. Found such info in the mods section!
-
macowneril2015
- Engineer
- Posts: 193
- Joined: Tue Nov 10, 2015 5:51 pm
- Sailboat: MacGregor 26X
- Location: Downtown Chicago, 2001 26X, 2001 50 Hp Nissan (NS50D2)
Re: Replacing companionway & hatch slides
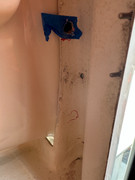
Please see the attached images the first one is of the inside of the bathroom where the liner is blocking access to the nuts for the bolts. I tried to drill one out but the other is not as useful (red mark shows approximate location of inaccessible nut access point). I bought replacement rails from BWY but they did not have any suggestions on replacing them. The second picture shows the condition of the rail and access point issues.
-
Dougiestyle
- Engineer
- Posts: 164
- Joined: Wed Oct 18, 2017 7:18 pm
- Sailboat: MacGregor 26X
- Location: Rockport TX
Re: Replacing companionway & hatch slides
Here is a link to how i did mine.
Dougiestyle
1998 26X , Nissan 50D, "Water Buffalo"
1998 26X , Nissan 50D, "Water Buffalo"
-
C Buchs
- Captain
- Posts: 605
- Joined: Thu Apr 23, 2015 6:49 pm
- Sailboat: MacGregor 26X
- Location: Camas, WA 98607
Re: Replacing companionway & hatch slides
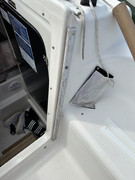
Here are a couple more pictures of how I did mine. I used butyl to seal everything back up. I found that putting a little ball in my socket was a good way to hold the nut in place while I wedged my socket into some spots.
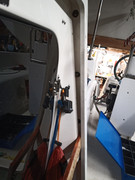
After removing the top bolts that hold the head wall in place I wedged a piece of wood into the gap to open it up enough to get to the bolts.
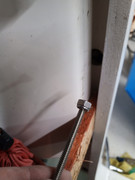
I couldn't get a socket with the nut into that hole, so I screwed this locking nut onto this longer screw backward so that I could get it in there and started.
Good luck...Jeff
After removing the top bolts that hold the head wall in place I wedged a piece of wood into the gap to open it up enough to get to the bolts.
I couldn't get a socket with the nut into that hole, so I screwed this locking nut onto this longer screw backward so that I could get it in there and started.
Good luck...Jeff
-
macowneril2015
- Engineer
- Posts: 193
- Joined: Tue Nov 10, 2015 5:51 pm
- Sailboat: MacGregor 26X
- Location: Downtown Chicago, 2001 26X, 2001 50 Hp Nissan (NS50D2)
Re: Replacing companionway & hatch slides
I wish I had posted and seen this before I drilled an access hole for the metal screw but this was very helpful I appreciate the detail of this video.
-
macowneril2015
- Engineer
- Posts: 193
- Joined: Tue Nov 10, 2015 5:51 pm
- Sailboat: MacGregor 26X
- Location: Downtown Chicago, 2001 26X, 2001 50 Hp Nissan (NS50D2)
Re: Replacing companionway & hatch slides
Jeff,C Buchs wrote: ↑Tue Sep 12, 2023 8:07 am Here are a couple more pictures of how I did mine. I used butyl to seal everything back up. I found that putting a little ball in my socket was a good way to hold the nut in place while I wedged my socket into some spots.
After removing the top bolts that hold the head wall in place I wedged a piece of wood into the gap to open it up enough to get to the bolts.
I couldn't get a socket with the nut into that hole, so I screwed this locking nut onto this longer screw backward so that I could get it in there and started.
Good luck...Jeff
You saved me trying to remove the insert, I was nervous to force it but these photos saved me. This forum has been an absolute lifesaver