Hi Tdb Frt!
Welcome to the forum!


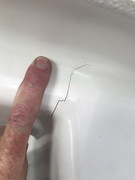
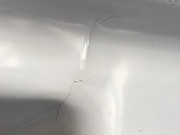
Based upon your photos I agree with JimmyT that this is part of your top deck structure and needs to be adequately repaired.
The flex aspect when a load is applied pretty much confirms it. The “loose” back stay is probably as a result of the ability of the top deck to flex. A little bit of angular movement near the base gets multiplied as it goes up the mast. So yeah, yer gonna have to fix it before it gets worse with each flex.
To do that I’d first determine what you can access and drill “stop crack holes” at the ends of any crack. The diameter of the “stop crack holes should be a minimum of 3x the material thickness. I’d recommend doing these holes first before any grinding. That way you can definitely know where the ends are BEFORE things get messy and blurred over.
Given that this area has already fractured its best to clean up an area larger than just the immediate area as there may likely stress damage to the area surrounding the crack, especially in the directions of crack propagation.
If the material is 1/4 inch thick that means an area to each side of the crack needs to be ground back by a minimum of 4-1/2 inches. More is better. This will give you the 18:1 slope that JimmyT mentioned. Less than that and there won’t be enough uniform load transfer back into good material.
For structural repairs You might want to open up the crack so you can get some backside reinforcement into place if that’s an option. Occasionally I’ve done that by drilling several extra holes around the cracks, flushing the back face with solvent to clean it up, mixing resin with 1 inch long glass fibers and working it through the holes and flattening it along the back face with something akin to an Allen wrench from the widened ground open crack. (Note: You need to adjust your surface grind back accordingly.)
The back surface reinforcement thickness should be about as thick as the original material.
Use slow cure non waxing resin.
While the back surface reinforcement (if you decided to go that route) is still wet start applying your exposed surface layers to a thinly wetted surface one layer at a time working out any entrained air. Ideally one would want to apply enough progressively wider layers to at least match the the original fiberglass surface being careful to roll out ANY air pockets and excess resin. The wetted fiberglass is the strength. Air and excess resin are useless, Especially in structural repairs.
When setting up your fabric pieces it’s a god idea to rotate the weave directions if possible to obtain a stronger finished structure. After you are finished apply a protective layer of waxing resin to seal. Let it cure throughly then de-wax. Sand to contour and apply thin layers of gelcoat. Allow to cure, sand and repeat as required.
Hopefully this helps.
Best Regards
Over Easy